Car Care ›
by Diego Ramirez
After a weekend camping trip left a set of rubber floor mats caked in dried mud, pine needles, and something that looked suspiciously like melted chocolate, the full value of knowing how to clean rubber car mats became immediately obvious. What should have been a five-minute task turned into a frustrating scrub session — all because the mats had gone months without proper maintenance. That experience is far more common than most drivers realize, and it highlights why a consistent car care routine matters for every surface inside the cabin, not just the paint and upholstery.
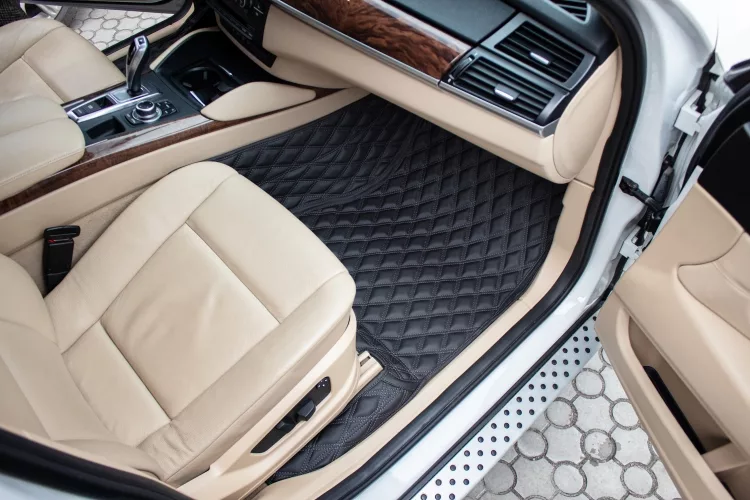
Rubber car mats take more abuse than nearly any other interior component. They trap road salt, absorb spilled coffee, and collect grit that grinds into the surface over time. Left unchecked, that buildup degrades the rubber compound itself, leading to cracks, discoloration, and a persistent musty odor that rivals vomit smell removal in difficulty. The good news: rubber is one of the most forgiving materials to clean, as long as the right approach matches the level of contamination.
This guide covers everything from quick weekly wipe-downs to deep restoration techniques, debunks common misconceptions, and lays out exactly when each method makes sense.
Contents
Not every speck of dirt warrants pulling the mats out of the vehicle. Understanding the difference between cosmetic dust and damaging contamination saves time and prevents unnecessary wear from over-cleaning. A light layer of dry dust or sand shakes off with a simple lift-and-tap against a hard surface. That takes ten seconds and requires zero products.
Cleaning becomes necessary when contaminants bond to the rubber surface. Road salt leaves a white crystalline residue that, if left through spring, chemically degrades vulcanized rubber compounds. Spilled liquids — especially sugary drinks and dairy — create bacterial colonies within the mat's textured channels. Mud that dries and cakes traps moisture underneath, fostering mildew growth between the mat and the carpet beneath it.
Seasonal triggers matter too. Mats should get a thorough cleaning at minimum after winter salt season ends, after any significant spill, and whenever a visible film or odor develops. Beyond that, a monthly maintenance wash keeps most mats in excellent condition. Drivers in wet climates or those with pets and children will skew closer to biweekly.
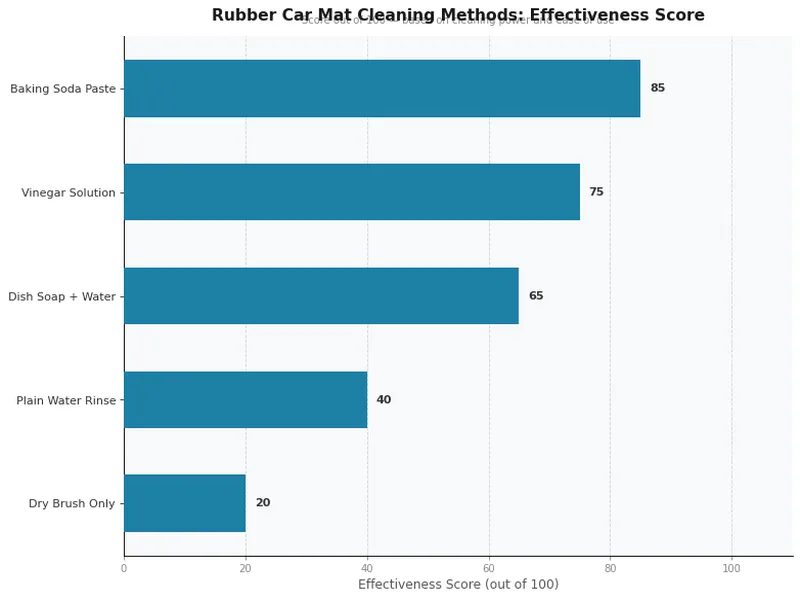
The biggest mistake people make when learning how to clean rubber car mats is reaching for the strongest cleaner first. Most situations call for nothing more aggressive than dish soap. Matching the method to the contamination level protects the rubber and avoids wasted effort.
Remove the mats from the vehicle. Rinse with a garden hose to dislodge loose debris. Apply a few drops of pH-neutral dish soap to a soft-bristle brush and scrub in circular motions along the channel pattern. Rinse thoroughly and shake off excess water. This process handles 80% of cleaning scenarios in under five minutes per mat.
For ground-in grime, oil spots, or discoloration, a baking soda paste delivers the best results without damaging rubber. Mix three tablespoons of baking soda with enough water to form a thick paste. Apply directly to stained areas, let it sit for ten minutes, then scrub with a medium-bristle brush. The mild abrasive action lifts embedded contaminants that soap alone cannot reach. Follow up with a thorough rinse — any residue left behind dries white and looks worse than the original stain.
Winter road salt and antifreeze spills require a slightly acidic solution to break the mineral bonds. A 50/50 mix of white vinegar and warm water works effectively. Spray it on, let it dwell for five minutes, then scrub and rinse. The same vinegar-based approach used on battery terminal corrosion applies here — mild acid neutralizes alkaline salt deposits without harming rubber.
Products matter less than technique. A cheap dish soap applied correctly outperforms a premium all-purpose cleaner used carelessly. These details separate a mediocre result from a factory-fresh finish.
Most rubber mats feature directional channels designed to trap water and debris. Always scrub along these channels first, then across them. Working with the pattern dislodges trapped material from the grooves. Working against it afterward catches anything pushed to the channel walls. Using only circular motions — the default instinct — skips over the deepest pockets of grime.
For WeatherTech-style deep-channel mats, a detailing brush or old toothbrush reaches areas a standard scrub brush cannot. The narrow channels in premium mats trap fine silt that builds up invisibly until the mat starts looking perpetually gray.
Never reinstall wet mats. Trapped moisture between the mat and carpet creates mildew, which produces an odor far harder to eliminate than any exterior stain. After rinsing, shake the mats vigorously and stand them upright against a wall or fence in direct sunlight. Fifteen to twenty minutes of air drying in warm weather is sufficient. In cooler conditions, wipe both sides with a microfiber towel before reinstalling. The underside matters just as much — that textured anti-slip surface holds water in its grip pattern.
There is a meaningful distinction between cleaning and restoration, and knowing which one a mat needs prevents both under-treating and over-treating the rubber.
| Factor | Basic Cleaning | Full Restoration |
|---|---|---|
| Frequency | Monthly or after spills | Once or twice per year |
| Time per mat | 3–5 minutes | 15–25 minutes |
| Products needed | Dish soap, water, soft brush | APC, baking soda, rubber protectant, medium brush |
| Stain removal | Surface-level dirt and dust | Embedded oils, salt damage, oxidation |
| Protectant applied | No | Yes — UV and anti-static coating |
| Mat condition after | Clean and functional | Near-original appearance and flexibility |
Basic cleaning maintains. Restoration reverses. A mat showing gray oxidation, surface cracking, or persistent tackiness needs restoration, not just another soap wash. Restoration involves an all-purpose cleaner (diluted 10:1), the baking soda paste treatment on discolored areas, and a rubber-specific protectant applied after everything dries completely. Skipping the protectant step after a deep clean leaves the rubber unprotected and accelerates the next round of degradation.
Several persistent myths lead drivers to damage their mats while thinking they are helping. The most damaging: using tire shine products on floor mats. Tire dressings contain silicone-based compounds designed for exterior rubber that faces UV exposure. Applied to floor mats, these products create a dangerously slippery surface under the driver's pedals. This is not just an aesthetic mistake — it is a genuine safety hazard.
Another common myth is that pressure washers clean mats faster and better. High-pressure water absolutely removes surface debris quickly, but it also drives fine grit deeper into the rubber's pore structure and can delaminate textured surfaces on cheaper mats. A garden hose provides more than enough pressure for any rubber mat.
The bleach myth persists too. Bleach does kill mold and mildew, but it also breaks down rubber polymers and causes premature cracking. Vinegar handles the same antimicrobial job without the material damage. For truly severe odor situations, an enzymatic cleaner designed for automotive use outperforms bleach in every measurable way.
Finally, the idea that rubber mats are "self-cleaning" because water runs off them is fundamentally wrong. Water runs off the top surface. The channels, textures, and undersides accumulate contamination that only manual agitation removes.
After a deep clean, applying a water-based rubber protectant extends mat life significantly. Spray-on protectants designed for interior rubber — not tire dressings — add UV resistance and prevent the rubber from drying out. Apply a thin, even coat to the top surface only. The underside needs its full grip coefficient against the carpet, and any protectant there reduces the friction that keeps the mat from sliding under the pedals.
Protectant application frequency depends on climate. In southern states with intense UV exposure through windshields, every two months is appropriate. In northern climates, quarterly application after salt season cleanup is sufficient. Over-application creates buildup that attracts dust and defeats the purpose.
Drivers who swap between rubber winter mats and carpet summer mats need a proper storage protocol. Clean the off-season mats thoroughly before storage. Stack them flat — never rolled, which causes permanent curl at the edges. Store them in a cool, dry location away from direct sunlight. A large garbage bag prevents dust accumulation during the off months. Mats stored dirty develop permanent staining as contaminants etch into the rubber compound over weeks of contact, much like how neglecting other interior surfaces leads to issues that are far harder to remove once they set.
Knowing how to clean rubber car mats properly takes less time than most drivers spend searching for answers online. Grab a bucket, some dish soap, and a brush, pull those mats out this weekend, and establish a monthly routine that keeps them in top condition — the entire process takes under twenty minutes for a full set of four, and the difference in cabin cleanliness and smell is immediately noticeable.
 |
 |
 |
 |

About Diego Ramirez
Diego Ramirez has been wrenching on cars since his teenage years and has built a deep practical knowledge of automotive maintenance and paint protection through years of hands-on work. He specializes in fluid service intervals, preventive care routines, exterior protection products, and the consistent habits that extend a vehicle's lifespan well beyond average. At CarCareTotal, he covers car care guides, cleaning and detailing products, and exterior maintenance and protection reviews.
Get some FREE car parts & gear.. Or check out the latest free automotive manuals and build guides here.
Disable your ad blocker to unlock all the hidden deals. Hit the button below 🚗
| | | |