8 Reasons Your Car Is Shaking While Driving and 4 Solutions
by Sarah Whitfield
Has your steering wheel ever begun trembling at highway speed, sending a low-frequency vibration up through your hands and raising an immediate question about what is breaking down beneath you? Understanding the full range of car shaking while driving causes and solutions puts you in control of that diagnosis before a small imbalance or a misfiring cylinder compounds into a repair bill that dwarfs what early action would have cost.
Vehicle vibration is your car communicating stress — in the tires, the engine, the drivetrain, or the brakes. The location and timing of the shake almost always point directly to the source, giving you a reliable starting point. This guide covers eight primary causes, proven diagnostic techniques, a side-by-side comparison chart, and four repair strategies that eliminate the problem correctly.
8 Reasons Your Car Shaking While Driving and 4 Solutions
The 8 Most Common Car Shaking While Driving Causes and Solutions
Most vibration problems fall into one of three categories — tires and wheels, engine and ignition, or drivetrain and axle systems. Identifying which category applies to your situation narrows the diagnosis considerably before you ever lift the hood or crawl beneath the chassis.
Tire and Wheel Issues
Tires account for the majority of shake complaints across all vehicle classes, making them the correct first checkpoint in any vibration diagnosis. The four tire-related causes to rule out first are:
Out-of-balance tires: Even a 0.25-ounce imbalance at highway speeds creates a noticeable wobble that typically appears between 55 and 65 mph and smooths out at higher or lower speeds as the resonant frequency shifts.
Uneven tire wear: Cupping, flat spots, and feathering all create rhythmic vibration that worsens progressively as the tread pattern continues to deteriorate under normal driving loads.
Damaged or bent wheel: A pothole impact can deform an alloy rim enough to create a persistent, speed-sensitive shimmy that no amount of balancing fully corrects, because the root cause is geometric rather than rotational mass distribution.
Loose lug nuts: Improperly torqued lug nuts allow the wheel to shift microscopically under braking and acceleration, producing a lateral wobble that also feels like loose steering in the hands.
Engine and Ignition Problems
When the shake originates in the cabin floor or the seat rather than the steering wheel, the engine and its supporting systems become the primary suspects. The most common causes in this category are:
Worn or fouled spark plugs: Misfiring cylinders deliver uneven power pulses to the crankshaft, creating a loping, rhythmic shudder that is most pronounced at idle and under light throttle. If you are already dealing with a rough idle, a cylinder misfire from a degraded spark plug is the first thing to investigate.
Clogged or failing fuel injectors: Restricted fuel delivery starves individual cylinders at specific throttle positions, producing hesitation and vibration under acceleration that clears once fuel pressure normalizes after you lift off the throttle.
Failing ignition coil: A degraded coil pack fails to fire its assigned cylinder reliably, causing misfire-driven vibration that is identical in character to a bad spark plug but remains resistant to plug replacement alone. The symptoms of a bad ignition coil typically appear alongside a check engine light and P030X misfire codes that tell you exactly which cylinder is misfiring.
Broken motor mount: Motor mounts isolate engine oscillation from the chassis structure; when one fractures or the rubber isolator collapses, raw engine vibration transfers directly to the floor, firewall, and seat.
Drivetrain and Axle Failures
Drivetrain vibration tends to appear at specific speeds or specifically under load, and it is frequently confused with tire issues until a more thorough inspection reveals the actual source. The key drivetrain causes are:
Worn CV axle or CV joint: A damaged constant-velocity joint typically produces a clicking sound during turns first, but as wear progresses it generates a shuddering vibration under hard acceleration that travels most strongly through the floorboard.
Out-of-balance or damaged driveshaft: On rear-wheel and all-wheel drive vehicles, a bent or unbalanced driveshaft creates a high-frequency buzz at specific highway speeds that intensifies noticeably under throttle load.
Low or degraded transmission fluid: Insufficient fluid causes the transmission to slip and hunt between gears, generating a shudder during gear changes that is easily mistaken for an engine issue. Identifying low transmission fluid symptoms early prevents far more serious damage to the valve body and internal clutch packs that follows when the problem goes unaddressed.
Pro insight: Vibration that appears only during acceleration and disappears the moment you lift off the throttle points to drivetrain or engine mounts before tires — that load-dependent behavior is a reliable mechanical signature of powertrain stress, not wheel imbalance.
How to Read the Shake and Pinpoint the Source
Effective troubleshooting of vehicle vibration starts with a disciplined observation of when and where the shake occurs, because the pattern carries far more diagnostic information than most drivers realize. Five minutes of careful attention during a test drive frequently replaces hours of random parts replacement.
Speed-Dependent Vibration
Speed-dependent vibration — shaking that appears within a narrow mph band and diminishes outside of it — points almost exclusively to rotating components. Use this checklist to narrow the source before touching a single bolt:
Vibration beginning around 55–65 mph that smooths above 70 mph: tire imbalance
Vibration that increases steadily from 45 mph upward with no speed at which it plateaus or clears: bent wheel or structurally damaged tire
High-frequency buzz between 65 and 75 mph that intensifies specifically under throttle: driveshaft imbalance
Shudder specifically during hard acceleration from a standing stop: CV axle or collapsed motor mount
The NHTSA tire safety program recommends inspecting tires monthly for uneven wear patterns, which are the leading early indicator of the rotational imbalances that eventually produce speed-dependent vibration in passenger vehicles.
Brake-Induced Vibration
If the shaking appears specifically when you apply the brakes and vanishes the moment you release the pedal, the brake system is the source rather than the tires. The most common brake-related causes are:
Warped brake rotors: Rotors that develop lateral runout from repeated aggressive stops without adequate cool-down time create a pulsing sensation through both the brake pedal and the steering wheel that worsens in proportion to pedal pressure.
Uneven brake pad deposits: Glazed or unevenly transferred pad material creates high and low friction zones on the rotor surface that produce a judder at moderate braking force even when the rotor itself measures within runout spec.
Stuck brake caliper: A seized caliper that drags constantly generates heat, accelerated rotor wear, and a combined pull-and-shake under braking. If you are already hearing a grinding noise when braking, a stuck caliper is a primary suspect that requires inspection before rotor and pad damage becomes irreversible.
Warning: Vibration felt through the brake pedal itself — not just the steering wheel — indicates rotor lateral runout exceeding 0.002 inches, the threshold beyond which resurfacing no longer produces a reliable fix; replacement is the only correct action at that measurement.
Vibration at Idle
A shake that is present at idle but diminishes once the engine warms up or at higher RPMs narrows the source to engine systems rather than rotating components. Key causes of idle-specific vibration include:
Misfiring cylinders from worn spark plugs or failed ignition coils
Vacuum leaks that cause an erratic, hunting idle speed
Collapsed or oil-contaminated engine mounts under rest load
Carbon buildup on the throttle body restricting airflow at low RPM
Idle vibration that worsens when the transmission is placed in gear but settles in neutral isolates the cause to engine mounts, while vibration that remains consistent across all selector positions favors a fuel or ignition misfire as the source.
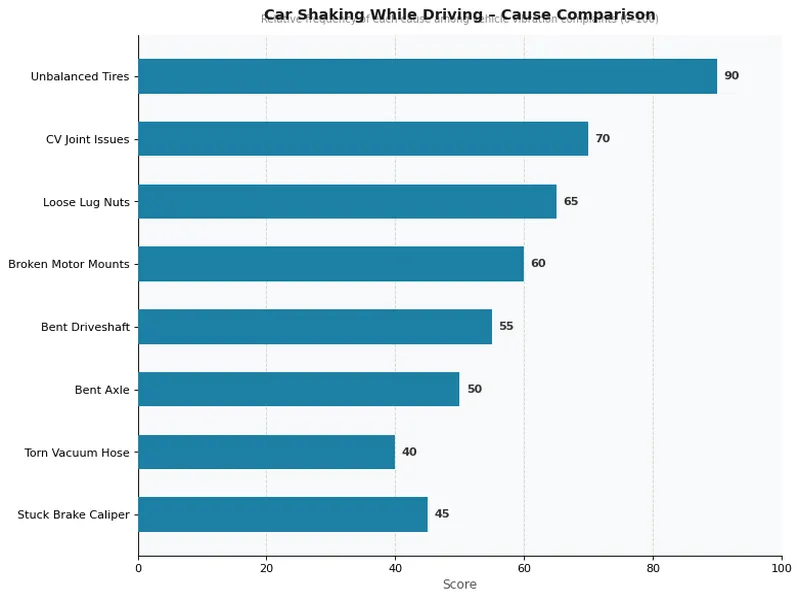
Car Shaking While Driving – Cause Comparison
Mistakes Drivers Make When Handling Car Vibration
Most drivers who live with a vibrating car for weeks before acting make a predictable set of errors that either worsen the underlying problem or lead to expensive parts replacement that misses the actual cause. Recognizing these patterns saves you both money and frustration.
Ignoring Early Warning Signs
The costliest mistake is normalizing a new vibration simply because it has not yet become severe. What starts as a mild shimmy at highway speed almost always escalates through a predictable progression:
An unbalanced tire you tolerate for 15,000 miles develops cupping wear so severe that the tire requires full replacement rather than the $25 balance that would have corrected it initially.
A misfiring cylinder left unaddressed deposits carbon on the catalytic converter and causes converter damage costing $800–$1,200 or more to repair.
A CV axle boot that splits and loses grease takes the entire CV joint to catastrophic failure within a few thousand additional miles of driving in that condition.
Warped rotors driven on for months score the brake pads unevenly, turning a straightforward rotor replacement into a complete brake job at twice the cost.
Misdiagnosing the Source
The second most common error is treating symptoms in isolation without checking the broader system that generated them. These specific misdiagnosis patterns waste money with regularity:
Replacing tires for a vibration actually caused by a bent wheel, and watching the new tires develop the same cupping pattern within 10,000 miles because the root cause was never corrected.
Replacing spark plugs when the actual cause is a failing ignition coil, resulting in the same misfire codes reappearing within 2,000–5,000 miles once the replacement plugs begin to foul from the same coil's weak secondary voltage.
Blaming wheel alignment for a vibration caused by tire imbalance — alignment corrects the angular relationship between tires and road, not the distribution of rotational mass.
Assuming a transmission shudder is an engine misfire and replacing ignition components before ever checking transmission fluid condition, level, and color.
Cause, Symptom, and Fix: A Direct Comparison
The table below maps each of the eight primary causes of car shaking while driving causes and solutions to its distinguishing symptom pattern and correct repair action, giving you a fast-reference guide for the most likely diagnosis before investing in parts or labor.
Floor and seat vibration, engine lurches on throttle blip
Motor mount replacement ($200–$600)
Worn CV axle
Acceleration and turns
Floorboard shudder on acceleration, clicking in corners
CV axle assembly replacement ($150–$450)
Warped brake rotors
Braking only
Pedal pulsation and steering wheel shake under brake pressure
Rotor replacement, axle pair ($150–$400 per axle)
Low transmission fluid
During gear changes
Shudder on upshifts, transmission hunting between gears
Fluid service or leak diagnosis and repair
Best Practices to Keep Vibration Under Control
Preventing car shaking while driving is substantially cheaper than repairing it after the fact, and the maintenance habits that deliver the greatest protection are neither complicated nor expensive when performed on schedule.
Tire Maintenance Habits
Tires are the single highest-leverage item in vibration prevention, and maintaining them correctly throughout their service life requires four consistent habits:
Balance every 12,000 miles or at every rotation: Balance weights shift off the rim from road impacts and normal flexing over time, so waiting until vibration appears means the imbalance has already begun generating the uneven wear that outlasts the simple correction.
Rotate every 5,000–7,500 miles: Moving tires front-to-rear and using the cross-rotation pattern for all-wheel drive equalizes wear across all four contact patches, eliminating the cupping and feathering that create rhythmic vibration on longer-interval tires.
Maintain correct inflation year-round: Every 10°F drop in ambient temperature reduces tire pressure by approximately 1 PSI, and underinflated tires flex excessively, wear the shoulders preferentially, and develop flat spots from extended stationary parking.
Inspect for impact damage after any significant pothole strike: A visible sidewall bulge indicates internal structural failure that no balance service corrects; that tire must be replaced regardless of remaining tread depth.
Scheduled Servicing Intervals
Beyond tires, staying current on manufacturer service intervals eliminates the ignition, fuel, and drivetrain failures that generate vibration before they develop into full mechanical failures that are dramatically more expensive to address. The service intervals with the most direct connection to vibration prevention are:
Spark plug replacement at manufacturer intervals — typically 30,000 miles for conventional plugs and up to 100,000 miles for iridium — prevents the progressive cylinder misfires that translate directly into engine vibration and accelerated catalyst wear.
Transmission fluid service every 30,000–60,000 miles on conventional automatics keeps the fluid's friction modifier package intact, which prevents the torque converter shudder that closely mimics engine vibration during highway cruising at light throttle.
Brake rotor inspection at every pad change catches lateral runout and thickness variation before they develop into the pedal pulsation and steering wheel shake that warped rotors generate under normal braking loads.
CV axle boot inspection every 30,000 miles catches torn or cracked boots before the grease loss that follows leads to joint wear under acceleration loads within a relatively short number of miles.
If your vehicle is also difficult to start in cold conditions alongside a shaking sensation at initial startup, the causes of a car hard to start when cold frequently overlap with ignition and fuel system deficiencies that contribute to both symptoms simultaneously and warrant diagnosis as a single connected problem.
4 Step-by-Step Solutions to Stop the Shaking
Each of the four solutions below addresses a specific category of vibration cause, and each is presented as a sequential process rather than a single action because proper execution is as important as the correct diagnosis in producing a durable result.
Solutions For Car Shaking When Driving
Solution 1: Balance and Rotate Your Tires
Inflate all four tires to the door-placard specification before the shop visit — balancing at the wrong pressure produces inaccurate results that will not hold at the correct operating pressure.
Request a road-force balance using a Hunter GSP9700 or equivalent machine, which simulates actual rolling load and identifies stiff spots in the tire carcass that spin balancing completely misses.
Ask the technician to measure tire uniformity alongside the balance; tires with high radial force variation should be repositioned on the rim or flagged for replacement rather than simply re-weighted.
After balancing, rotate the tires using the correct pattern for your drivetrain — front-to-rear for front-wheel drive, cross-pattern for all-wheel drive — to normalize any wear differential that existed before the service.
Retorque all lug nuts to the vehicle's specified value (typically 80–100 ft-lbs on passenger vehicles) with a calibrated torque wrench, not an impact gun set at operator discretion.
Solution 2: Replace Spark Plugs and Service Fuel Injectors
With the engine running, disconnect ignition coil connectors one at a time to identify the misfiring cylinder — the RPM drop will be minimal or absent on the misfiring cylinder compared to a healthy one.
Remove all spark plugs across the full set and inspect each electrode for wear depth, carbon fouling, and gap measurement; replace the complete set rather than only the most visibly fouled plug to prevent differential wear between cylinders going forward.
Transfer the coil pack from the misfiring cylinder to an adjacent healthy cylinder and clear the stored codes; if the P030X misfire code follows the coil to the new cylinder position, replace the coil rather than replacing additional plugs.
If the misfire persists after addressing plugs and coils, perform an injector balance test through your scanner's live data to check fuel trim deviation per cylinder; injectors driving significant positive long-term fuel trim corrections benefit from professional ultrasonic cleaning or replacement.
Clear all stored codes and complete a 20-mile drive across varied throttle conditions to confirm that the vibration and all misfire codes remain absent before considering the repair closed.
Solution 3: Inspect and Replace Suspension Components
Lift the vehicle on a quality floor jack and support it on jack stands at the manufacturer's specified frame pinch rails — never on suspension arms or subframe brackets — to allow full suspension droop for complete inspection access.
Grasp each front wheel at the 3 and 9 o'clock positions and attempt to detect lateral movement; play exceeding 0.5mm indicates worn tie rod ends or ball joints that create steering shimmy under real driving loads.
Inspect all CV axle boots for tears, grease sling marks on the inside of the wheel well, and hardened or cracked rubber that precedes complete boot failure and contamination of the joint grease.
Examine all visible motor mount hardware for cracking, oil contamination (oil-soaked rubber loses its damping properties well before visible cracking), and collapse or deformation of the rubber isolator element itself.
Replace components showing play, cracking, or contamination as complete assemblies rather than attempting boot-only repairs on a CV axle that has already run dry, since internal joint scoring is irreversible once it begins.
During the suspension inspection, also evaluate whether the vehicle pulls in a straight line — a vehicle that both shakes and pulls to one side while driving almost certainly has both a wheel or tire issue and a suspension geometry problem that need to be addressed together rather than sequentially, since correcting one without the other produces incomplete results.
Solution 4: Address Brake System Issues
Measure rotor thickness and lateral runout with a dial indicator; runout exceeding 0.002 inches or thickness below the discard specification cast into the rotor hat confirms that replacement is required rather than resurfacing.
Inspect brake pad wear across the full face of each pad — uneven wear from inner to outer edge indicates a sticking caliper slide pin rather than rotor warping, and the caliper slides must be cleaned and lubricated with high-temperature grease as part of any rotor replacement.
Replace rotors in axle pairs; installing a new rotor on one side while leaving a worn rotor on the other creates unequal braking force that produces both vibration and a brake pull under moderate pedal pressure.
Bed the new rotors and pads using the manufacturer's recommended break-in procedure — typically three to five moderate stops from 30–35 mph with adequate cool-down intervals between each — to establish a uniform friction transfer film on the rotor surface before any hard stops are applied.
Tip: Avoid using the parking brake for the first 200 miles after replacing brake rotors — applying static parking brake pressure to freshly bedded rotors leaves pad impressions on the surface that recreate the very pulsation you just corrected.
Quick Wins That Cut Vibration Fast
Not every vibration fix requires a shop visit or significant parts expenditure. Several interventions produce immediate, measurable improvement with minimal time and cost, and identifying which ones apply to your situation saves both money and unnecessary downtime at the shop.
Same-Day Fixes You Can Do Right Now
Correct tire pressure immediately: Check and inflate all four tires to the door-placard specification right now — a tire that is 8–10 PSI low generates enough sidewall flex to produce a noticeable vibration at highway speeds that disappears within minutes of achieving correct pressure.
Verify lug nut torque: If you had tires changed or rotated recently, confirm that all lug nuts are torqued to specification using a torque wrench; under-torquing by a tire shop is more common than most drivers realize and produces a wheel wobble that is trivially corrected.
Clean the throttle body: Carbon buildup on a throttle body with 50,000 or more miles creates an erratic idle that presents as a cabin shudder at stop lights; a can of throttle body cleaner and 20 minutes of careful work resolves the idle vibration symptom immediately in most cases.
Check for a missing wheel weight: Run your fingers along the inner and outer rim lips — a bare adhesion patch where a weight has detached explains why the vibration appeared suddenly after a highway drive where a pothole or curb strike knocked the weight off the wheel.
When to See a Mechanic Immediately
Certain vibration symptoms represent active safety hazards that require same-day professional inspection rather than a do-it-yourself diagnosis approach. Bring the vehicle in without delay if you observe any of the following:
Steering wheel vibration accompanied by a pull to one side, which together suggest wheel bearing failure rather than simple tire imbalance
Vibration that develops suddenly at highway speed immediately after a road impact, indicating possible structural damage to the wheel or tire that cannot be assessed by feel alone
Shudder under braking severe enough to activate the ABS on a clean, dry surface, which indicates complete rotor failure rather than mild warping that responds to resurfacing
Any vibration accompanied by a burning smell from a wheel area, signaling a seized brake caliper that is actively overheating the rotor, pad, and potentially the wheel bearing assembly behind it
Frequently Asked Questions
Why does my car shake only at highway speeds?
Highway-speed vibration that appears in a specific speed band — typically 55 to 65 mph — and smooths above or below that range is the signature of an out-of-balance tire. The imbalanced mass creates a resonant frequency at a specific road speed, which is precisely why the symptom is so speed-sensitive. A professional road-force balance corrects the issue in most cases, though a bent wheel or tire with high radial force variation requires additional corrective action beyond simple rebalancing.
Can a bad wheel alignment cause my car to shake?
Alignment corrects the angular relationship between tires and the road surface — it does not directly cause vibration. However, misalignment accelerates uneven tire wear over time, producing the cupping and feathering patterns that do generate vibration. If you have recently corrected an alignment issue but the vibration persists, inspect the tires for existing wear damage before concluding the alignment correction was insufficient.
Why does my car shake when I brake but not at other times?
Shaking that occurs exclusively under brake application is almost always caused by warped rotors or uneven pad material deposited on the rotor surface. The lateral runout — the side-to-side wobble of the rotor as it spins — creates alternating high and low friction zones that push back against the pad, producing the pulsation you feel through both the pedal and the steering wheel. Replacing the rotors in axle pairs and following the correct bedding procedure eliminates the symptom reliably.
How do I know if my car is shaking because of a wheel bearing?
Wheel bearing vibration presents as a hum or growl that changes pitch when you shift lateral weight by steering gently left and right at highway speed — loading one bearing increases its noise while unloading the opposite bearing reduces it. A failing bearing also produces detectable play when you grasp the wheel at 12 and 6 o'clock and attempt vertical movement with the vehicle supported on jack stands. Wheel bearing failure is a progressive safety issue that requires prompt replacement before the bearing seizes.
Can engine oil problems cause my car to shake?
Critically low engine oil reduces hydraulic pressure in the valve train and can cause variable valve timing systems to operate erratically on modern engines, producing an RPM-dependent vibration alongside ticking or rattling from the top end. If you have been ignoring an oil consumption issue, checking oil level is a logical first step before deeper diagnosis — and if your oil smells like gas, the fuel dilution and accompanying combustion irregularities can directly contribute to engine vibration at idle and light throttle.
Is it safe to drive a car that is shaking?
The answer depends entirely on the cause. A mild shimmy from an unbalanced tire is not immediately dangerous but accelerates wear on steering and suspension components over time, making a prompt correction worthwhile. Vibration caused by a failing wheel bearing, a severely worn CV axle, a seized brake caliper, or a wheel with structural damage represents an active safety risk that makes continued highway driving inadvisable. When you cannot immediately identify the cause, have the vehicle inspected before your next long trip rather than after it.
A shaking car is not a mystery to tolerate — it is a diagnostic message with a precise answer, and every mile you drive without reading it costs more than the repair ever would have.
Sarah Whitfield spent ten years as an ASE-certified automotive technician before transitioning to full-time automotive writing, giving her a diagnostic skillset that goes well beyond what most reviewers bring to the subject. She specializes in OBD-II code analysis, electrical system troubleshooting, and the intermittent failure modes that frustrate owners and confound general mechanics. At CarCareTotal, she covers car troubleshooting guides, diagnostic tools, and repair resources for drivers dealing with warning lights, strange symptoms, and hard-to-diagnose problems.